How to set up Wireguard VPN on OpenWRT: A Step-by-Step Guide
Update April 2023: It is now possible to shorten the setup process a bit and download a configuration file from the Shellfire Customer Center.
The Wireguard VPN is becoming increasingly popular among VPN users. Wireguard enables VPN download speeds that were previously unheard of. This is especially true for devices that don’t have a lot of processing power, such as your home router. While VPN routers often used to be stuck with single-digit Mbps speeds, powerful routers can now even achieve triple-digit values! Wireguard does not make compromises when it comes to security and uses strong state-of-the-art encryption.
Warning: The installation of OpenWRT and Wireguard may not be suited for beginners. Some commands may have to be entered via the Linux command line. Read these instructions carefully first and then decide if you are up to it. For all users who would like to enjoy a Wireguard VPN connection without manual configuration, we recommend the Shellfire Box. Here, everything is pre-configured and you can even change the VPN server at any time with just a few clicks.
Table of Contents
Key Points
- Learn how to install WireGuard on your OpenWRT router, configure the necessary software, and generate cryptographic keys for a secure VPN connection.
- Explore advanced configuration options to optimize VPN speed, manage multiple peers, adjust MTU settings, and strengthen security through firewall rules.
- Resolve common connection issues and consider using a pre-configured VPN solution like the Shellfire Box for a hassle-free experience.
What do you need to install Wireguard on your router?
First of all, you need a home router that runs on the free OpenWRT operating system with the LuCI interface installed. OpenWRT can be installed on many routers, but you may void your warranty by installing it. Warning: An error during the installation of the OpenWRT firmware may permanently “brick” your router! Therefore, it may be worth looking for a router that already comes with OpenWRT pre-installed. It is important to have a relatively recent OpenWRT version installed that already supports Wireguard. We’re using a Shellfire box in this guide for simplicity’s sake, although of course we don’t actually need a manual Wireguard installation here.
You also need a VPN server that provides Wireguard access. Your VPN provider will provide you with the necessary credentials. We will use Shellfire VPN here.
Finally, you need a PC with an internet browser and the possibility to establish an SSH connection (optional since April 2023). Mac OS and Linux offer this possibility via the built-in terminal, under Microsoft Windows we use PuTTY for the SSH connection.
Installing Wireguard on the router
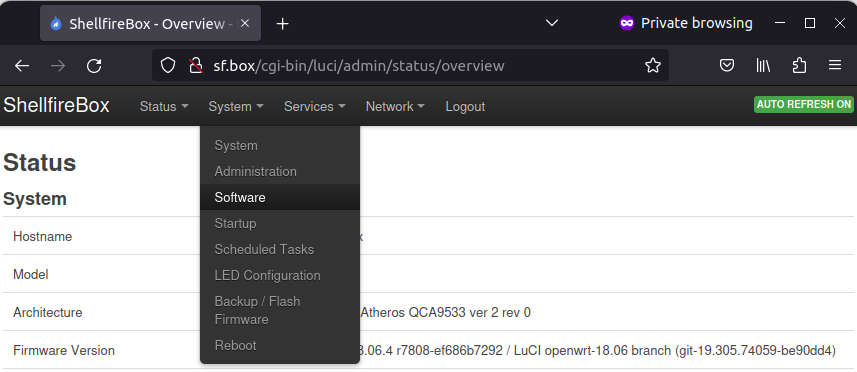
First we install the Wireguard software packages on the OpenWRT router. To do this, log into the LuCi web interface. It can typically be found at http://192.168.1.1/, but some routers use a different address. Depending on the installed OpenWRT version, the displayed windows may look slightly different, but the procedure is the same for all versions. First navigate to System -> Software.
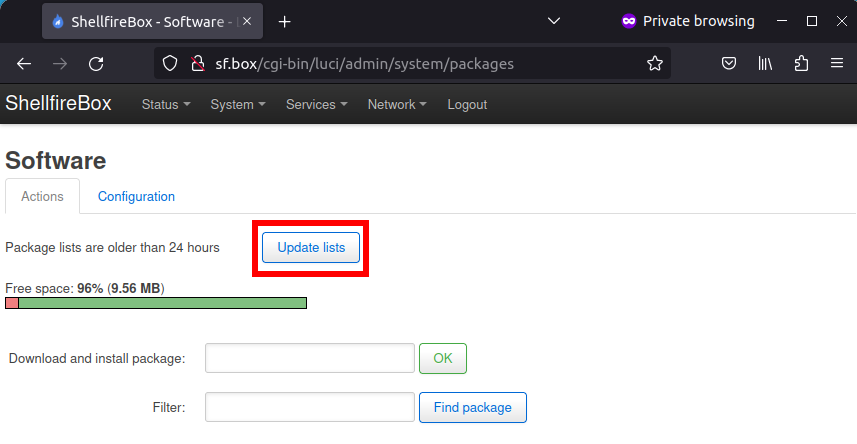
Now click on “Update lists”. OpenWRT will now search for the latest available software packages.
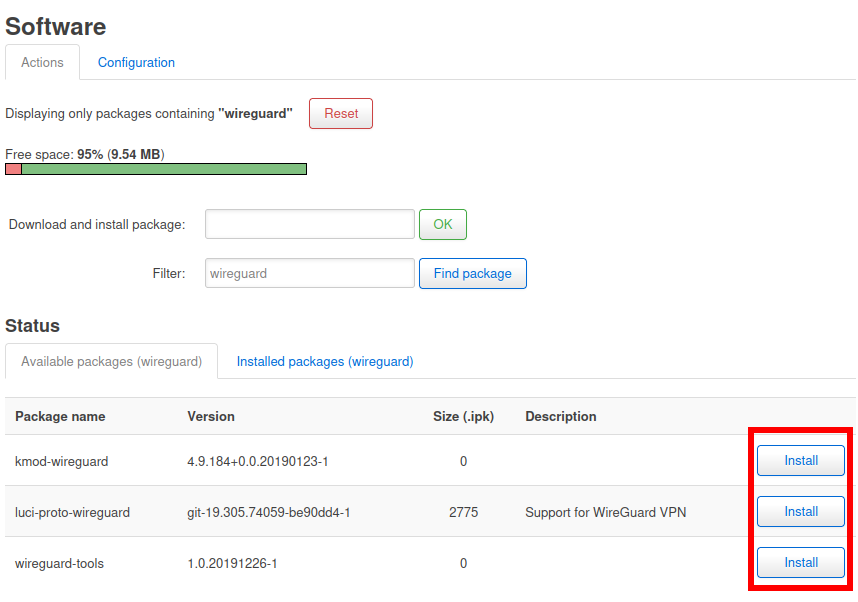
Once this process has finished, search for the term “wireguard” and install the packages “kmod-wireguard”, “luci-proto-wireguard” or “luci-app-wireguard” and “wireguard-tools”.
Once the installation is complete, the next step is to create the keys.
Wireguard VPN Key Generation
Update April 2023: In the customer center on shellfire.net you can now find a configuration file download. This file already contains all keys, so you don’t have to generate your own keys. However, generating your own keys has certain advantages regarding the security of the encryption.
Wireguard uses so-called public key encryption. Both the VPN server and the client generate their own key pair. One of these keys is public (public key), while the other remains secret (private key). In order for the encryption to work, both partners need to know their own private keys as well as the public key of the other party. The first step is to create the key pair. To do this, we log in to the router via SSH, as mentioned above either via Terminal (mac OS / Linux) or via PuTTY (Windows). To log in via SSH, we need the IP address of the router and the router password. The username is “root”. In some circumstances you may need to enable SSH access in the router’s web interface first. So typically you would connect via SSH to 192.168.1.1.
Once successfully logged in, we first create the /etc/wireguard folder and then change to that folder.
mkdir /etc/wireguard

cd /etc/wireguard
Now we generate the key pair.
wg genkey | tee privkey | wg pubkey > pubkey
Finally, we display both keys.
cat privkey

cat pubkey
IMPORTANT: The private key must never fall into the wrong hands! As soon as an attacker knows your private key, he can decrypt any data encrypted with it.
With our keys we can now configure the Wireguard connection.
Configure Wireguard VPN Cilent
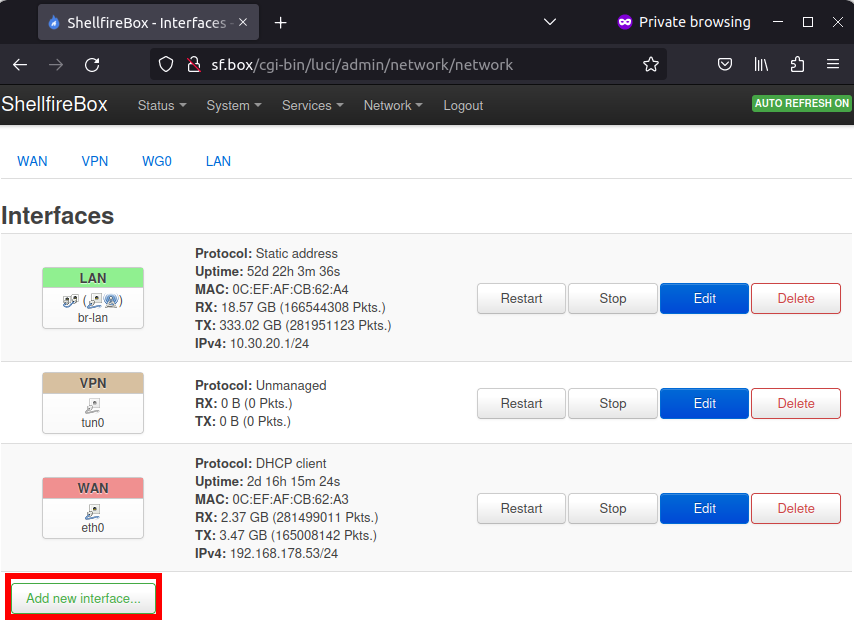
We now switch back to the LuCI web interface and navigate to Network -> Interfaces. Click on “Add new interface”.
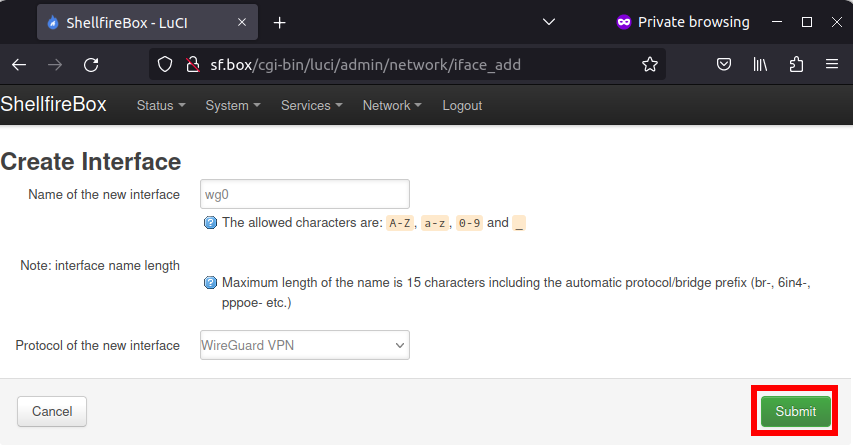
Next, select a name for your connection as shown in the screenshot (we use “wg0” here) and specify “Wireguard VPN” as the protocol.
We now need to edit the settings of the new interface. Enter the connection parameters that we get from our VPN provider. In the case of Shellfire VPN, you will find these after logging into the customer center at shellfire.net and then selecting your VPN from the gray QuickAccess bar at the top of the screen. First we need the internal VPN IP address, the server address and the public key of the VPN server. Transfer this data to the OpenWRT web interface as shown in the screenshot.
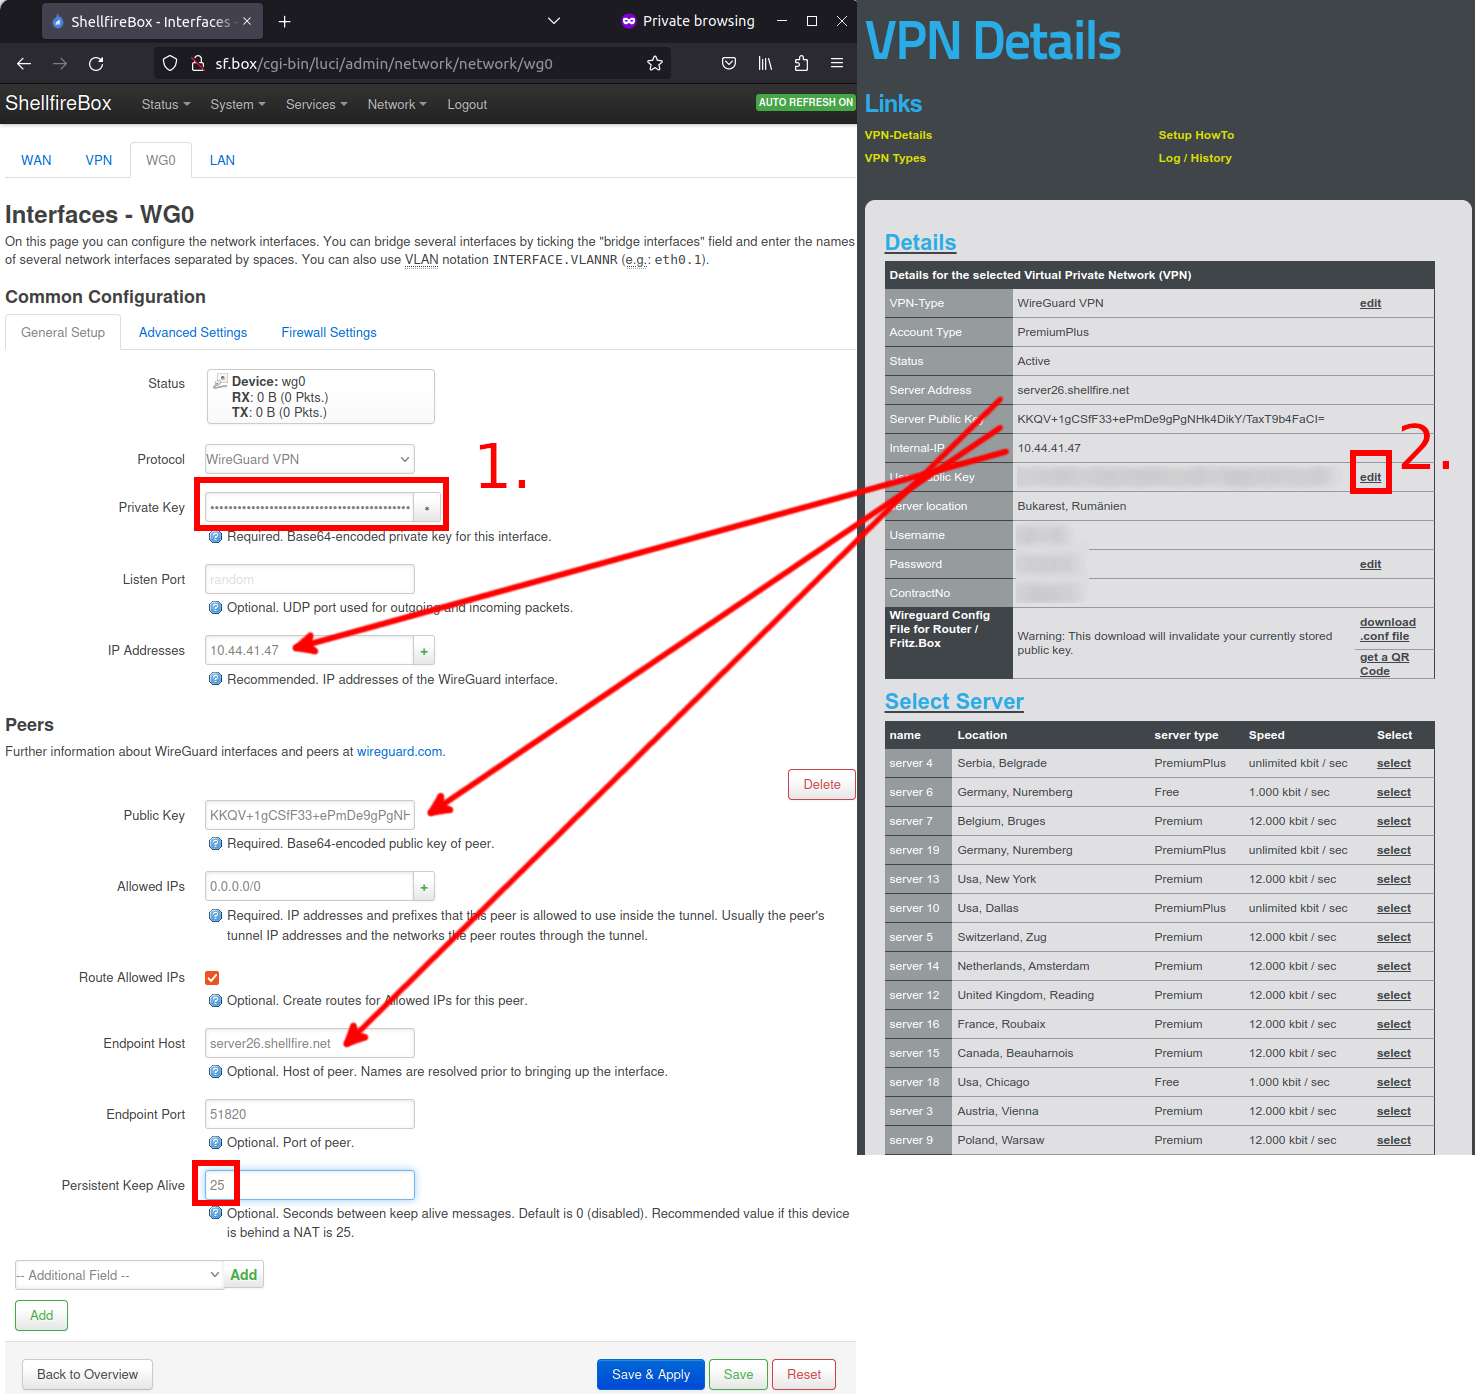
Next, transfer the private key that you generated via the SSH connection (or the private key from your downloaded VPN configuration file) into the “Private Key” field (marked as 1. in the screenshot).
The following step can be skipped if the configuration file was used:
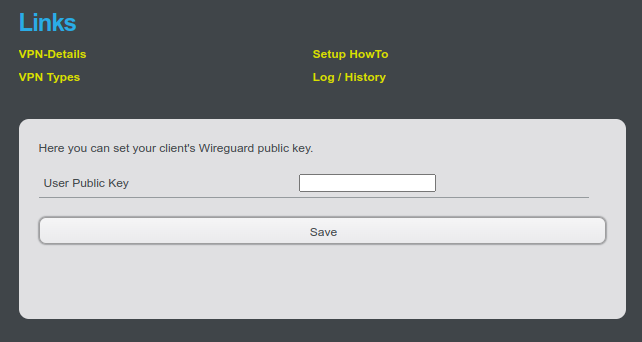
Click on “Edit” in the Customer Center (marked with 2.) and enter your public key generated via SSH there.
Enter 25 as Persistent Keep-Alive.
Warning: We would like to point out once again that you should never give away your private key.
If all values are correct, click on “Save & Apply”. The Wireguard interface is now almost completely configured.
Creating a firewall zone
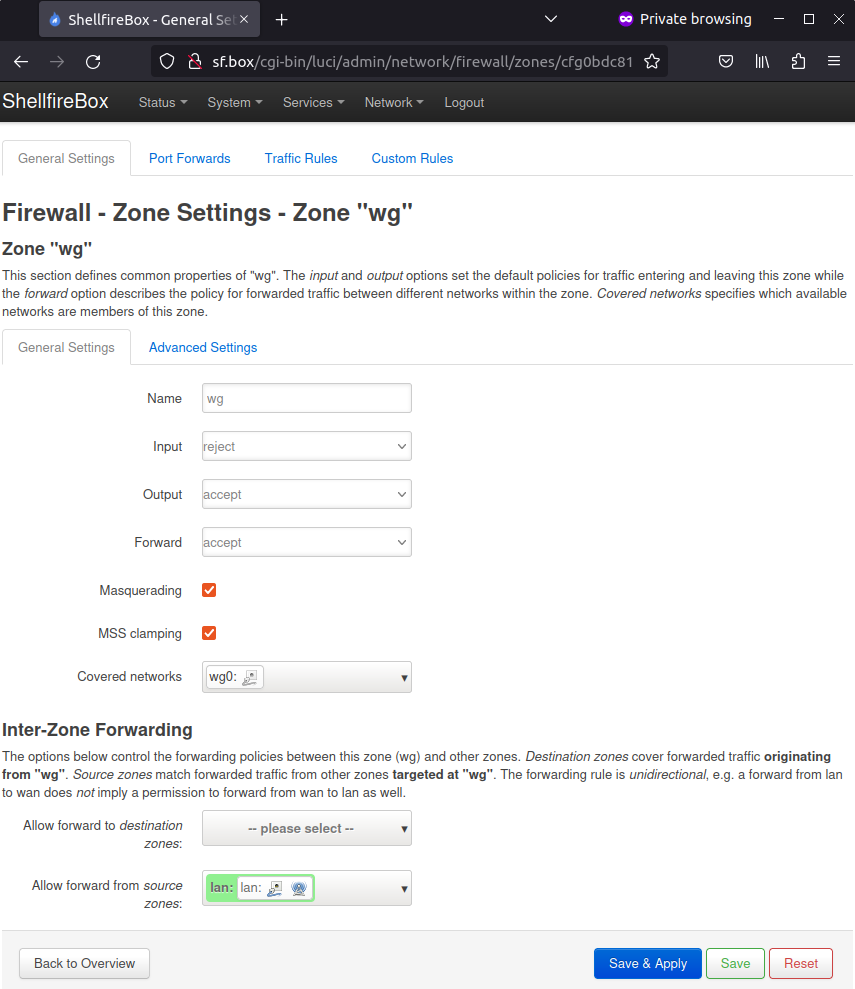
Your router now needs a firewall configuration. This way it knows how to handle the data flowing through the Wireguard interface. Click in the OpenWRT LuCI interface on Network -> Firewall and then on “Add”. You can find the necessary settings in the following screenshot. When you are done, click “Save and Apply” here as well.
DNS settings
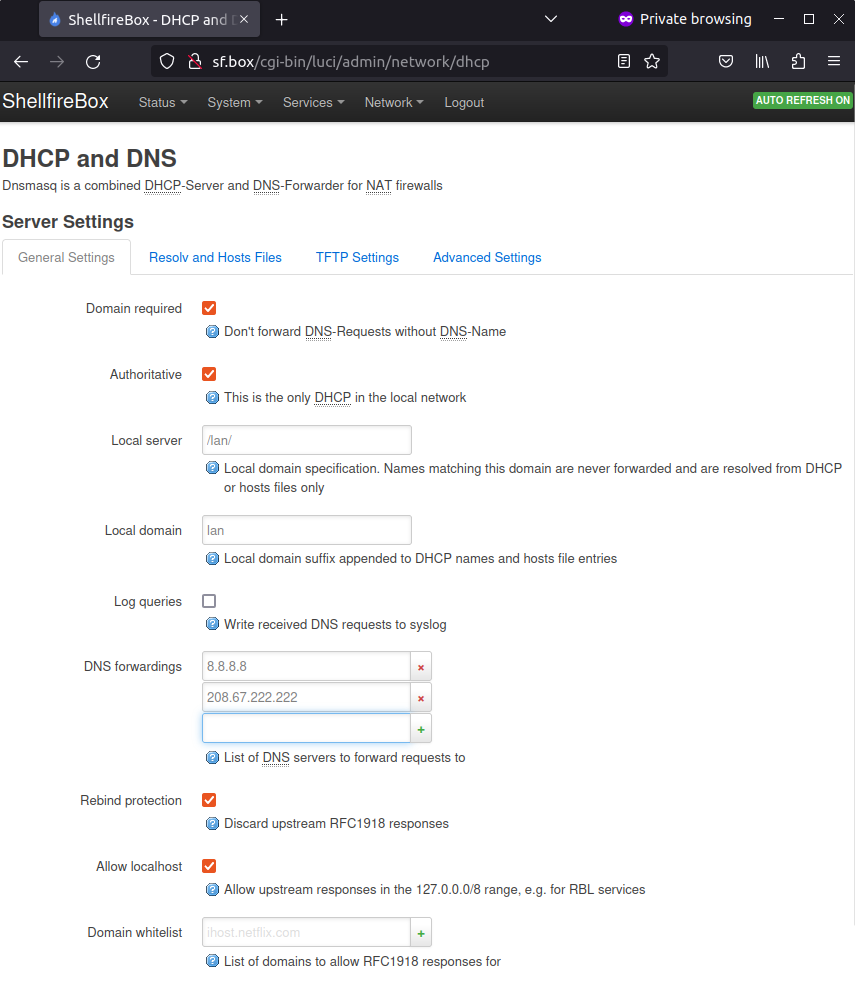
Your router now needs one or more DNS servers so that queries such as shellfire.de can be translated into the corresponding IP address. You can make this setting under Network -> DHCP and DNS. We enter the IP addresses 8.8.8.8 (Google DNS) and 208.67.222.222 (OpenDNS) under DNS forwarding. Other DNS services are also possible, you can find an overview here. Again, click on “Save & Apply”
Establishing the Wireguard connection
Everything should now be configured. In order for Wireguard to work, it is usually necessary to restart the router. To do this, you can restart the router under System -> Reboot. Alternatively, you can disconnect your router from the power supply for a few seconds and then reconnect it.

After the restart you can click on “Connect” under Network -> Interfaces next to your wg0 interface. The VPN connection is now established!
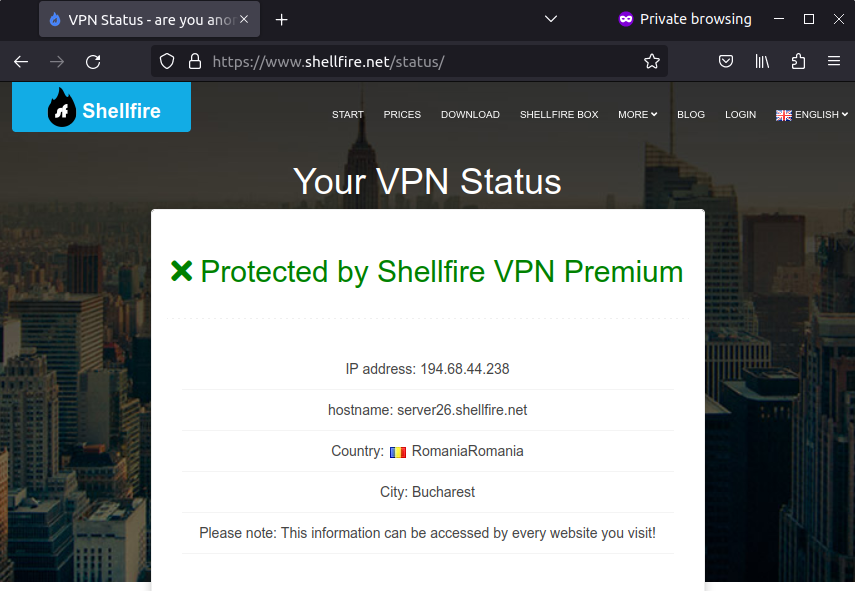
Verifying the Wireguard VPN connection
Once you have established the VPN connection, all data should automatically flow through the VPN. You can check your protection status at https://www.shellfire.net/blog/status/. If you use another VPN provider, you can use websites like https://www.wieistmeineip.de/.
Troubleshooting Common Issues When Setting Up WireGuard on OpenWRT
While setting up WireGuard on OpenWRT is typically straightforward, some users may encounter issues that hinder the proper functioning of their VPN. Here are solutions to the most common problems you may face:
Connection Error: WireGuard Fails to Connect
If WireGuard isn’t connecting, check the following:
- Firewall Configuration: Ensure that the necessary ports are open. WireGuard uses UDP port 51820 by default, so it’s essential to allow traffic on that port.
- Incorrect IP Addresses: Verify that the IP addresses assigned on both ends match the peer configuration. Misconfigured IPs are one of the main causes of connection errors.
- Mismatched Public/Private Keys: Review the cryptographic keys. If the public and private keys of the peers do not match, WireGuard will not be able to establish a secure connection.
Performance Issues: Slow Connection
Some users experience slower speeds than expected with WireGuard. To resolve this:
- VPN Server Location: Try switching to a VPN server closer to your physical location to reduce latency.
- Limited Bandwidth: Older OpenWRT routers may have bandwidth limitations. Consider upgrading your hardware if necessary.
Connection Drops
Frequent disconnections may indicate an issue with WireGuard’s keep-alive settings:
- Keep-Alive: Configure the
PersistentKeepaliveparameter in your peers to ensure the connection stays active, even when there isn’t constant traffic.
Addressing these common issues ensures that your VPN connection remains stable and secure, protecting your privacy while browsing both public and private networks.
Advanced Configuration: Optimizing WireGuard Performance on OpenWRT
For advanced users, optimizing WireGuard’s performance on OpenWRT can make a significant difference in both speed and security. Here are some advanced configurations to help you maximize your VPN’s potential:
Using Multiple Peers and Servers
If your VPN connection is saturated or you’re experiencing high latency, consider configuring multiple VPN servers and balancing traffic between them. This is particularly useful for high-demand connections or users needing access to multiple locations.
- Configuring Multiple Peers: You can add several peers in the WireGuard setup and switch between servers as needed without having to reconnect the entire system.
Optimizing the Cryptosystem
WireGuard uses cryptographic keys to secure connections, but you can improve both security and performance by adjusting key rotation times.
- Key Rotation: Configure a more frequent key rotation interval to ensure that the connection remains secure. This is especially important for users concerned about data interception.
Reducing Latency with MTU (Maximum Transmission Unit)
Adjusting the MTU can help reduce latency and improve connection stability. The default setting is usually sufficient, but in some cases, manually adjusting it can offer benefits:
- How to Adjust the MTU: In the WireGuard interface on OpenWRT, try lowering the MTU if you notice network performance delays, typically adjusting to values between 1280 and 1420.
These advanced configurations allow WireGuard to operate at its peak performance on your OpenWRT router, optimizing both speed and security.
Security Best Practices When Using WireGuard on OpenWRT
WireGuard offers strong security out of the box, but there are several best practices you can follow to further secure your network when using OpenWRT. Below are some key recommendations to maximize the security of your VPN:
Configuring Specific Firewall Policies
A properly configured firewall is essential for blocking unauthorized access to your network. In OpenWRT, ensure the firewall is set to:
- Allow Only VPN Traffic: Configure rules to restrict incoming and outgoing traffic through the WireGuard interface, blocking any unwanted external connections.
- Blocking Unauthorized Traffic: Use whitelisting to allow only specific devices on the network, preventing potential attacks on vulnerable devices.
Limiting Access to Specific Devices
If you share your network with multiple devices, you may want to restrict which devices can access the VPN. This is particularly useful for ensuring that only critical devices, like personal computers or smartphones, use the encrypted connection.
- How to Limit Access: You can set up rules in OpenWRT to filter devices by MAC address, limiting access through the WireGuard interface to specific devices only.
Monitoring and Alerts
Keeping an eye on your network traffic is crucial for detecting any suspicious activity.
- Enable Logging in OpenWRT: Configure OpenWRT to log traffic passing through the WireGuard interface, so you are aware of any unauthorized access attempts.
- Real-Time Alerts: Use monitoring tools to receive alerts if anything unusual occurs on your network, such as failed connection attempts.
By following these best practices, you ensure that your VPN connection is as secure as possible, protecting all devices connected to your network from external threats.
Conclusion
Setting up WireGuard on OpenWRT may seem complex, but with the right tools and configuration, you can unlock high-speed, secure VPN performance even on low-powered routers. By following these steps and best practices, you ensure your online privacy and security are protected across all your devices.
If you’re looking for a simpler solution or don’t want to go through the manual setup process, the Shellfire Box is the perfect choice. Pre-configured and easy to use, it offers top-notch security and allows you to change VPN servers with just a few clicks.